We’ve recently had to pivot to fully remote church service at my church, for reasons that are hopefully quite apparent.
We had a few constraints
- Accessible by the technically illiterate - need to see the stream in a single click
- We wanted several people presenting - to keep a discussion and community feel
- As little contact as possible - ideally none. All the presenters meeting in 1 place means that one infection can take down the lot, not to mention the public health concerns of doing such.
- Usable by technically illiterate - the presenters are not necessarily literate either
Is this your situation? The good news is, we did this in a relatively straight forward way - using OBS Studio, Zoom and YouTube Live.
Read on to see how
TL;DR
The solution we’re going for is as follows
- Start your YouTube Live session, and get the streaming key
- All presenters dial in to 1 team meeting (be it Zoom, Hangouts, Teams, whatever)
- Using OBS
- Configure to stream to your YouTube live
- Set the computer audio as an audio source
- Set a video, screenshare, or static image as a video source
- Reduce your bitrate if you’re only sharing an image
- Have a countdown timer for stream start (bonus)
- Start streaming
- When all is tested, tell YouTube to “go live”
That’s it! More details below - we’ll do the simplest possible version (static image, audio only)
Setup people’s studios
Your presenters need decent sound quality
- Buy a good mic. I can recommend the Yeti mics (I’m not affiliated, they’re just awesome)- I got exceptional results out of even the Yeti Nano.
- Read the mic instructions. Worth it.
- Do some rudimentary sound proofing - a matress against the window, close the door
- Do some rudimentary echo prevention - hang some towels or sheets over large flat surfaces to absorb the sound
- Ensure decent internet access - plugged in directly via cable (not wifi), if possible!
Prepare YouTube Live
First step is to get YouTube live going.
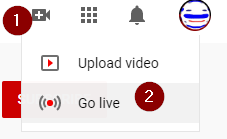
Log into your YouTube account in your browser, and choose “Go Live”
You’ll have to wait 24 hours now - presumably this is to reduce spam live streaming. Hopefully this isn’t last minute for you
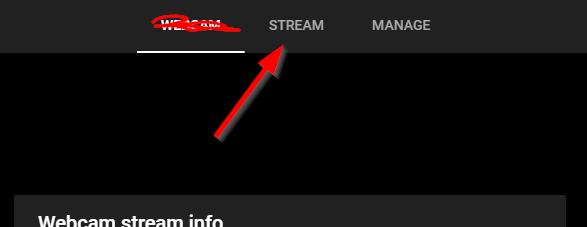
After you’ve waited a day, press the same thing, and it will try and start a webcam-based stream. We do not want this - instead, press the “Stream” tab at the top:
Now fill in all the deets - a title, whether it’s public or unlisted, etc. etc. - hopefully you can figure this out.
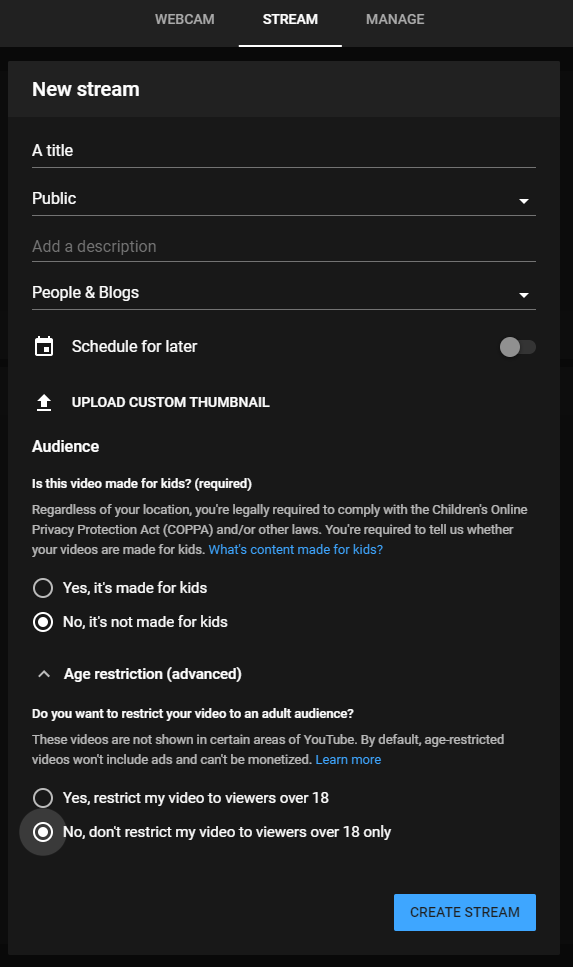
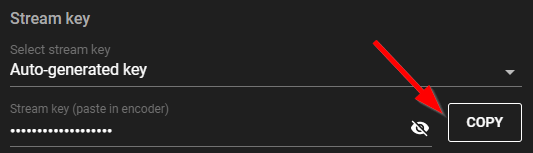
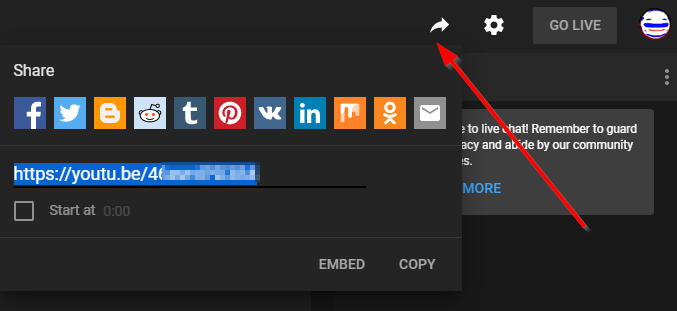
Press Create Stream when you’re done. From here, you’re taken to the streaming mode - the bit that matters for OBS is the Stream key:
this

or this
That’s it for YouTube live for now - it’s basically waiting for you to start streaming to it.
At this point, you have access to the share URL - you can set this up days in advance if you’re crazy enough, people will just get told it’s not going yet.
So onto OBS.
Download, install and configure OBS
Head to the OBS Studio Download Page and download OBS.
After you’ve installed (next, next, next) and started it, you’re greeted with a fun start screen. WooOOOooo.
Say no to autoconfiguration - mosty because you need to learn not just get it working this one time.

I’ve numbered the parts as follows
- Scenes - different configuration profiles (eg. different events)
- Sources - where your audio and video come from
- Mixer - Mute your audio as you want
- Some buttons. Click them and they do things.
- Preview
Step 1: New scene
Create a new scene for this stream, and give it a name (eg. “Trivia Night” or “Sunday Church Service”)

Step 2: Add a static image source
After you’ve made a sweet image (I recommend at 1920x1080), we’ll use this for the scene.

Choose Create New, give it a name, and press OK
You will see a popup to choose your image file - browse to it, choose your file, and hit OK.

Step 3: Add audio source
It gets a little more complex here (and clearly assumed windows). Your computer has 2 audio configurations - one that is system-wide, and one for individual apps or browser windows.
For example, when I’m working, I use my speakers to pump tunes out, watch videos, and such - but whenever I’m in a meeting, I use my headset.
In this case, I set my system audio to My pumpin' rad speakers, and my audio for Teams (or Zoom, or Skype or whatever) to My boring headset.
For these purposes, we will use one audio output for Zoom, and another audio output for everything else - this is mostly a safety step so any notifications don’t show up in the live stream. If you don’t have a secondary audio device (eg. a bluetooth headset), just make sure you’re not running any other apps that might make sounds.
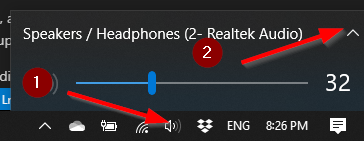
We’ll cover the zoom audio later, but to set your system audio, use the volume in the system tray and select the preferred device:
Now in OBS, add an “Audio Output Capture”, and choose the audio source you’ll be using for Zoom:
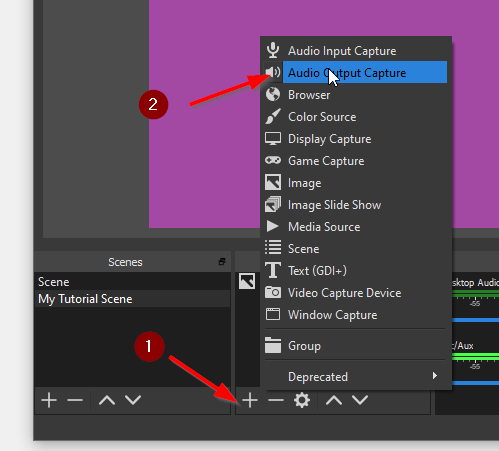
Call it something helpful - I called mine “Presenter Audio (Zoom)” to be clear
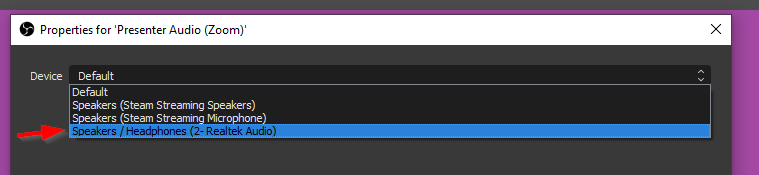
You will get a popup now to choose your device - this is important - choose the device you expect the presenters (ie. Zoom) to be using.
Step 4a: Your own mic
If you want to also present to the live stream, you’ll want to add your own mic as an input source - add an “Audio Input Source”, and choose “Use existing” to ensure it’s there.
Just make sure you’re not using speakers and a mic together, or your viewers will get reverb. Test it first.
Step 4: Get your mixer right
By default, your audio mixer will contain desktop audio as well as a mic. You will also see an entry for your recently added presenter source.
Mute the 2 default ones (so they don’t distract you - you can even hide them), and adjust the presenter volume so that ordinary speaking hovers in the yellow - you want to avoid red, as it clips, but you want to have enough space to turn it up or down depending on presenter volume.

Step 5: Enter your stream key!
I nearly published this post without this step…
Go to OBS settings, the “Stream” category, and configure it for YouTube.
Paste in the given stream key from way up the page!

Bonus: If you’re just using a static image, go to the “Output” category, and set your Video bitrate to 500kbps (well, that’s what I used). You can even reduce your FPS in the Video tab - it’s just a static image after all! I run mine at 10FPS and 500kpbs, just incase my Internet decides it’s slow for a bit - audio is most important in my case
Zoom (or whatever)
Not much detail here - create a Zoom meeting as always, and be sure to SET YOUR AUDIO SOURCE TO THE CORRECT ONE *ahem*. It’s important.
Send people the Zoom link, ask them to join
Start Streaming to YouTube LIve
In OBS press “Start Streaming” in the bottom right. You’re off!
If you switch over to YouTube now (well, you’ll have to wait 30seconds or more), you should see your image.
Right now, only your YouTube account (or accounts with enough access to your channel) can view it - once you press “GO LIVE”, then it’s ready for the world to see.
But first…
Sanity checks
It’s best to do a few tests - get someone to help you here, or if you have a clear head, join your Zoom meeting on your phone (be prepared for feedback).
Some tests you’ll want to run - at least until you’re used to it all
- Play some random video or spotify or something on your computer. the mixer shouldn’t show any signal for it - it’s a different audio source
- Unmute the little preview video in YouTube Studio, and have someone in the zoom meeting talk. You should hear them after 30 seconds or so.
- (Note this may be disorienting - you’ll hear them initially from Zoom, and then again 30 seconds later on YouTube. If you’re testing from your phone, it will pick up the audio from youtube, and send it to the zoom meeting again. Loop loop loop!)
- Try muting and unmuting the zoom audio source, make sure any conversation never goes to your YouTube Studio video
- Talk yourself. Your presenters should hear you (from Zoom), but it won’t go to YouTube live
Go live
Time to go live! I have a little routine I do hear to ensure it’s a crisp start.
Even if you’re very familiar with the setup, go live (without audio) 5 or 10 mintues early - you may want to play some public domain music too (don’t get copyright hammered)
- In OBS: Mute the zoom audio source
- Wait 30 seconds or so for YouTube to catch up
- In YouTube studio hit “Go Live”
- Wait for it to go live
- Talk to your presenters - “1 minute until live” etc.
- At 10 seconds to go, give them a countdown “10… 5… 3, 2, 1, Go”
- At “Go”, immediately unmute their OBS audio source, mute your microphone in Zoom (so they can’t hear you clicking around and being distracting), and have them start talking
That’s it! You’re live! Keep an eye on the audio mixer levels - adjust them to keep it about equal.
Note: YouTube will frequently complain that your bitrate isn’t high enough for their standards. They’re catering for much more professional setups - if you’re on terrible Australian infrastucture during a pandemic, you’ll know that 5000kbps is probably out of most of our reach.
Congrats!
You did it, you’re live. Winning!
For a lot of cases, this is enough - you’re essentially doing a podcast on a publically accessible platform for free. This is enough for most communities, don’t overcomplicate it if you don’t have to.
Bonus?
…But if you must, some more ideas
- Engage your audience with YouTube live chat - if they’re not savvy enough to monitor the chat themselves, then just send them SMS messages or something with the questions, or answer them directly as the channel. Don’t forget your viewers are at least 30 seconds behind in the stream video
- Grab a countdown timer for OBS for the early viewers (eg. here or here. Note I can’t vouch for these ones, I can’t find the one I ended up downloading… so use at your own risk). I use white text with a black border, so it’s always readable.
- Author a countdown video, with some music and stuff, to keep early joiners interested. You can just reuse the same one each week
- Share the Zoom screen if you want faces - add a “Window Capture” layer, and use the “Windows Graphics Capture” method, which will grab the video as well.